日式芝士蛋糕

出爐啦!千祈唔好變皺皮呀婆呀!>_<

好彩姐, 個面好平滑, 一D皺皮都無!!
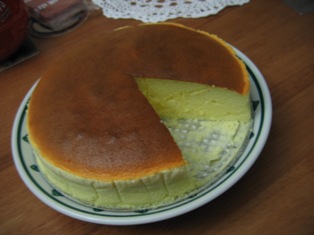
成個食鬼咁, 真有趣!!
用咗幾個配方混合而成嘅呢個食譜好掂呀, 好食之餘, 連外觀都一樣ok, 本來好担心出爐後個面會變皺, 好彩最後無事, 熱食嘅時候好香芝士味, 質地好綿密, 入口即溶, 而雪凍嚟食就好滑, 有口感, 但又唔會太漏, 總之一句講晒就係正啦! 所以下次再整要一次過整幾個至得啦, 如果唔係就肯定唔夠喉lu!!
Comment內附食譜
posted by 布冧仔 @ 6:21 pm
![]()

15 Comments:
下次再整幾個??? 我冇我份先 ??? 焗到個面唔爆, 好厲害喎, 我次次焗親都會爆開架 !!
Can you post your recipe for the cake? I tried making it twice and everytime it shrinks after I take it out of the oven and it's all wrinkled... =( Yours look beautiful and yummy!
布LUM仔,
第一次上來,立即給這蛋糕嚇呆!(會長為證!)
怎樣才能做到蛋糕不裂?我的永不皺皮,但總是變了爛頭何...-__-OOO
還有,很回味你包的水飽~可以教我有甚麼技巧嗎?
monique,welcome for coming my blog, I will post the recipe as soon!!
cass, 好開心你嚟探我呀, 其實想個頭唔爛的話, 我想是溫度的問題, 事關我在頭20mins是用170度焗(蒸焗), 見有起"色"就將之調至150度再焗40mins, 如你認為色水已夠及用手按面部份時已可慢慢回復而不凹下去, 就可將錫紙或硬紙板放面, 然後再焗多10mins就ok嫁啦!你再試吓啦!
至於上次整嘅上雲吞實在太失禮啦, 無落上湯齋食口感差太遠了, 所以我見最後剩下很多
-_-", 如果你不嫌棄的話, 下次你有gathering請預我一份,我可以帶備材料一起玩吧!!
Vanlily, 係呀, 上次話整都隔咁耐至Dick起心肝整, 如果我好似你同綠萼咁勤力就好lu!!>D<
布lum仔,
上次的雲吞超好吃~雖然沒有湯所以乾了,但我也吃了很多呢~
告訴你一個秘密:
那天我在焗椰賓,聞到一陣濃郁芝士味,以為自己傻了...原來因為我在看你的日式芝士蛋糕相!
我用的溫度比你低,當然是蒸焗,但未上色已開始爆口了-__-
This comment has been removed by a blog administrator.
綠萼, 真係多謝你嘅贊賞, 下次再整雲吞時, 必定預埋你一份, 包好的雲吞可放冰格存放很久亦很好吃, 如你是一個無"飯"煮婦就最好不過, 放水一滾就吃得, 很方便!!
你說你在焗包時聞到芝士味? 你真可愛,想食就快動手吧! 最衰你我屋企隔太遠了,不然我會常"偷"訪你家, 那我就可偷懶不用整也有份吃^-^
p.s.真的很欣賞你的文筆,常覺你似某一位作家!!哈哈, 可能係也說不定!!
材料:
忌廉芝士 180g
牛奶 100g
牛油 35g
低筋粉 20g
粟粉 10g
蛋黃 3隻
蛋白 3隻
塔塔粉 1/4tsp
糖 70g
醋 1/4tsp
製作過程:
1.忌廉芝士加入牛奶浸軟, 然後隔水加熱至無顆粒, 再加入已溶化的無鹽牛油拌勻, 熄火放涼
2.篩入低粉及粟粉拌勻, 再加入蛋黃拌勻最後加入醋拌勻至光滑
3.蛋白打成粗發泡狀態後, 加入塔塔粉打勻, 糖可分數次加入打至企身, 再最後一分鐘用最低速打可打走多餘的氣泡, 焗好後的蛋糕會軟綿細密很多
4.將1/3的蛋白與麵糊混合好後, 再將剩餘的蛋白混入
5.入模後可輕敲數下
6.用蒸焗法, 放入已預熱的焗爐以170c焗15-20分鐘, 然後再用160焗30-35分鐘即可出爐
Thank you for the recipe! It is very different from the one I used before... I'll try it and hope that it comes out as nice as yours!
布冧仔,
妳的日式芝士蛋糕好靚呀,它也是我最喜歡的蛋糕,不知我的新爐能否焗到這麼靚?請問妳用的是否17cm模?
謝謝妳來我的小小世界呢!:)
Hum....終於揾到妳喇,啲蛋糕焗得好靚噃,希望有機會試食。得閒嚟探我.....
http://hk.myblog.yahoo.com/solitude-100years
真係焗得好好呀, 我次次焗都會爆口, 跟住就皺皮架勒>.<
It looks so yummy.... I want to try it. :D
I will try to bake one using your recipe. Hopefully, it will turn out as good as yours.
hi there,
i happened to visit your blog in search of a good japanese cheesecake recipe and yours is definitely what i am looking for. it looks so good. i am looking forward to making your recipe. by the way, can you please do me a favor? can you convert the gram measurement to teaspoon/cup? thank you so much!!!
Post a Comment
<< Home